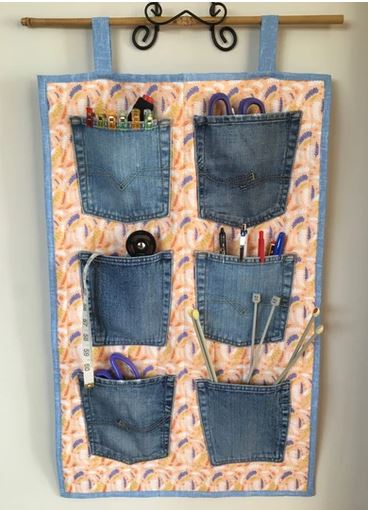
Upcycled Hanging Organizer
Courtesy of Crafty Mammy Fabrics
Two things we can all use a little more of in our lives: organization and upcycling. This upcycled organizer from Crafty Mammy Fabrics’ new blog is a perfect fit for just that!
You will notice a detailed supply list below. As a beginner, it will be helpful to know that what is called “batting” here in the States, overseas is referred to as “wadding.” This is the layer that goes in between your fabrics to give it a more plush feel. Also, if you do not yet have a walking foot, you can still give this project a whirl, try to improvise and use what you have handy at home.
Supplies
-
Fabric for the front – 18.5″ wide x 28.5″ long
-
Fabric for the back – 20.5″ wide x 30.5″ long
-
Wadding – 18.5″ wide x 28.5″ long (I have allowed 0.5″ extra in my sizing to allow for trimming and squaring off after quilting as explained below)
-
Spray adhesive (optional but very useful!)
-
Denim pockets
-
Sewing machine
-
Walking foot
-
Thread
-
Fabric glue
-
Erasable pen/chalk
-
Iron
-
Bamboo stick
-
Scissors or rotary cutter
-
Cutting mat
-
Quilters ruler
Let’s get started!


It was very difficult to stick all your layers of fabric down exactly straight so the lines I have just drawn were a great guide to help me square off the fabric. To do this I peeled back the blue backing fabric so that it’s well out of the way and then lined my ruler up with one of the lines I had previously drawn. Then using my rotary cutter I cut of any excess fabric/wadding so that I had a nice neat, straight edge. I did this for all four sides and deliberately DID NOT cut the blue backing fabric at this point. The backing fabric should be 1 inch wider on each side. Once I had the top fabric and wadding squared off, I then put the the backing fabric into place and squared that off ensuring I had 1 inch extra the whole way around.

Just sew down the lines previously drawn and iron your fabric to remove the pen marks.

Next, arrange the denim pockets on your fabric and sew on. This was difficult to do as the denim was quite thick. I used a walking foot on my machine and still couldn’t sew to the very top of each pocket. I sewed as far up as I could and then stuck the last bit down with fabric glue and it held it perfectly.

Now it’s time to do the edging. I deliberately left the backing fabric 1 inch bigger to make this easier. Of course you don’t have to do it this way… you can cut the backing fabric the same as the rest and add a binding if you wish.
Start by folding the fabric half an inch in on one side and giving it a quick press as you go. Although the next two picture shows the side of my wall hanging I actually started at the top (apologies for my photo error!)

Fold over the remaining half inch so that it now covers the top fabric, ironing down as you go. Clip or pin to keep in place.
Moving right along…


Now do the same at the bottom. Fold your fabric up half an inch, then fold it up again the remaining half inch to cover the top fabric.
Then start to form the corners. If you’re looking at your wall hanging and doing the bottom left you are folding it up with your left hand to form the triangle. Then when you’re doing right hand side you are folding it up with your right hand to form the triangle. Fold in half an inch at both sides as above and clip/pin the area.


Now start at the top left and fold the remaining half inch in to form the corner. This will be a little fiddly but you’ll get there. I snipped away a little of the bulk of fabric at the corner to leave a nice neat, flat finish.
I then folded in the remaining half inch at the bottom left corner so that both corners were neat before folding in the remaining fabric in between.
Do the same on the right hand side. Again, I like to get the corners right first and then fold in the remaining fabric in between.


Fold over right sides together and pin or clip. Sew down with approx 1/4 inch seem allowance. Turn them the right way out and press.

Sew right around your wall hanging, fixing the edging in place and sewing the tabs in place as you go . Insert a piece of bamboo into the tabs, hang up and enjoy 🙂

One Comment