
Over the years I have seen so many great varieties and tutorials for how to sew an apron. For the purposes of “beginner sewing” I wanted to share one with readers that is easy to follow with simple steps, but has a cute overall look when finished. After you gain more experience and confidence in your sewing skills, you can try out some other tutorials that offer options such as ruffles or other embellishments. But for now, let’s stick with the basics. Back Road Bloom Old-Fashioned Homemaking has the perfect tutorial to share with you.
But wait! I had a hard time picking just one. So, to keep things all about aprons, I also included a few others as well. Starting with a YouTube video for the more visual beginners with a smaller apron one that gives inspiration for upcycling an old button down following that. And another to use up your fat quarters that you love collecting.
Not ready to sew an apron yet? Save this post on Pinterest for later…


Aprons are the perfect, homemaker accessory! Learn how to make your own in this simple project for beginners.
If aprons are not already a part of your everyday uniform, you should really consider having a few on hand! They are great for keeping your clothes clean throughout the day, they can be super cute, and its always a bonus if they have pockets;)
I was recently gifted an apron around Christmas time with a really beautiful, Christmas style print. I love the fit and style so much that I wear it ALL the time. Now that its not Christmas anymore, I wanted to try recreating the apron in a more summer appropriate pattern/color.
To make this simple, DIY apron I just followed the pattern and style of my previous apron because I already knew I loved the fit. I’m so happy with how it turned out! Learn how you can make your own DIY apron in the sewing tutorial below.

DIY APRON FABRIC
For the apron in this tutorial I just used some simple, cotton fabric that I picked up from JoAnn’s. The other apron that I love is made from a similar fabric, so I knew wanted to go down that same route. Cotton fabric is inexpensive and comes in a variety of colors and patterns.
Linen fabric would also be a great option for this DIY apron, but would be a little more expensive. Also, if you prefer something more durable then I would suggest a thicker fabric like you would find in the home section.
The fun thing about sewing your own apron, is that you get to customize it to exactly what you want. You can choose the colors, patterns, fabric, and style! This DIY apron cost me less than $5 to make, and just a couple hours of time.
DIY APRON SUPPLIES
- about 1 yard of your chosen fabric
- coordinating thread
- measuring tape
- scissors
- sewing machine
DIY SIMPLE APRON CUT LIST

It might sound complicated what I’m describing in the cut list for the main piece, but its not! Basically you are cutting a large rectangle, and then cutting out curved edges on either side to make an apron shape.
Another Note: I wanted thinner ties for my apron, but it makes things a little more difficult, especially if you don’t have a special tool for turning the fabric right side out after you’ve sewn it. You’ll know what I mean when I explain below! If you don’t want to get the special tool or try the DIY version, make your ties 4″ x 25″, and they should be much easier to work with, but will be thicker (as thick as the neck strap in the photos).
Main Piece: 32″ x 27 1/4″ rectangle, cut first. Mark off 9″ in the center on one of the 32″ sides for the neckline. Mark 15 1/4″ from the bottom of the main piece up towards the neckline, on both 27 1/4″ sides. Cut a curved line from the side marks up to the neckline on both sides to make an apron shape.
Neck Strap: 4″ x 22″ – Cut 1.
Ties: 2″ x 25″ – Cut 2. (or 4″ x 25″, thicker ties, but easier to work with, see note above).
Pockets: 8″ x 8″ – Cut 2.
DIY SIMPLE APRON FOR WOMEN SEWING INSTRUCTIONS
First things first, you’ll need to cut out all of the pieces from your cut list. Once everything has been cut out, you can start to prepare each of the pieces.
PREPARE THE NECK STRAP AND TIES
For the neck strap, you’ll want to fold the fabric in half horizontally (like a hot dog), with both of the pattern sides facing each other. It should look inside out, like this.

Now you’re going to sew along the edge of the long, open side. Don’t sew the small, top or bottom ends and only sew about a 1/4″ in from the raw edge.
Once you’ve finished sewing the long edge, use your fingers to turn the fabric inside out. You should be left with a long strap.
Next you are going to do the same process for the ties. Fold the ties in half with the right sides facing each other. This time, also sew ONE of the small sides (top or bottom), and then down the long side.
If you decided to do thicker ties, then you should be able to easily turn the fabric right side out using your fingers once you’ve finished sewing. If you wanted to do thinner ties, HERE is great video explaining a few different methods for turning the fabric back right side out (it will be super difficult to do with just your fingers)
PREPARE THE POCKETS
Time to prepare your pockets! Heat up your iron. You should have (2) 8″ x 8″ squares. Fold down one edge of each of the squares about 1/4″ – 1/2″ to create a hem. This will be the top of the pocket. Iron the hem line and pin it if you feel its necessary. Sew the hem down.

Once the top edge is hemmed, lay out your main apron piece and place your pockets on top. You’ll want to place each pocket 3 1/2″ from the outside edge, and 4 1/2″ from the bottom edge of the main apron piece. Remember to put the hemmed edge at the top (closest to the neckline).
Fold each of the three, un-hemmed edges underneath. You’re going to be hemming the rest of these edges and sewing it to the main piece, at the same time. Pin the pocket in place.

Start with one pocket pinned in place, and sew down the edge of the right side first, 1/4″ – 1/2″ in from the edge of the pocket, to sew the pocket to the apron.
To create a straight corner, once you get to 1/4″ from the bottom of the pocket, stop sewing and turn the fabric 90 degrees. Now sew down the bottom edge. Stop and turn once you get to the other corner, and sew the final side all the way up to the top of the pocket.
Repeat this process for the second pocket. You should be left with two pockets sewn onto your main piece, top edges hemmed and open.

PREPARE THE MAIN PIECE OF THE APRON AND ATTACH IT ALL TOGETHER
Heat up your iron again. Fold down the top, neckline edge of the apron about 1/4″ – 1/2″ to create a hem, and iron in place. Now, take your neck strap and place each raw edge on the corners of the neckline like shown.
I’m sorry, I didn’t get a photo before I sewed it!

Pin into place if you need to. Sew along the edge of the neckline, sewing the neck straps into place while at the same time hemming the top edge.

Fold down and iron the rest of the edges of the apron to create a hem all the way around. Before you sew, place your ties on the main apron piece where the vertical edges meet the curved edges. Place the ties with the raw edges against the hem (so the sewed ends are out). Pin in place. Hem all of the edges, sewing over the ties to sew them into place.
Then, you should be finished! Cut off any loose thread, and look over your apron to make sure everything is sewed tightly.
Note my small mess up when I was sewing the neck strap into place! That’s okay though:)

I hope you enjoy your new apron! This would make a super cute, handmade gift for any ladies in your life. And it works with a pregnant belly;)

Video Tutorial from Erica
UPCYCLED APRON

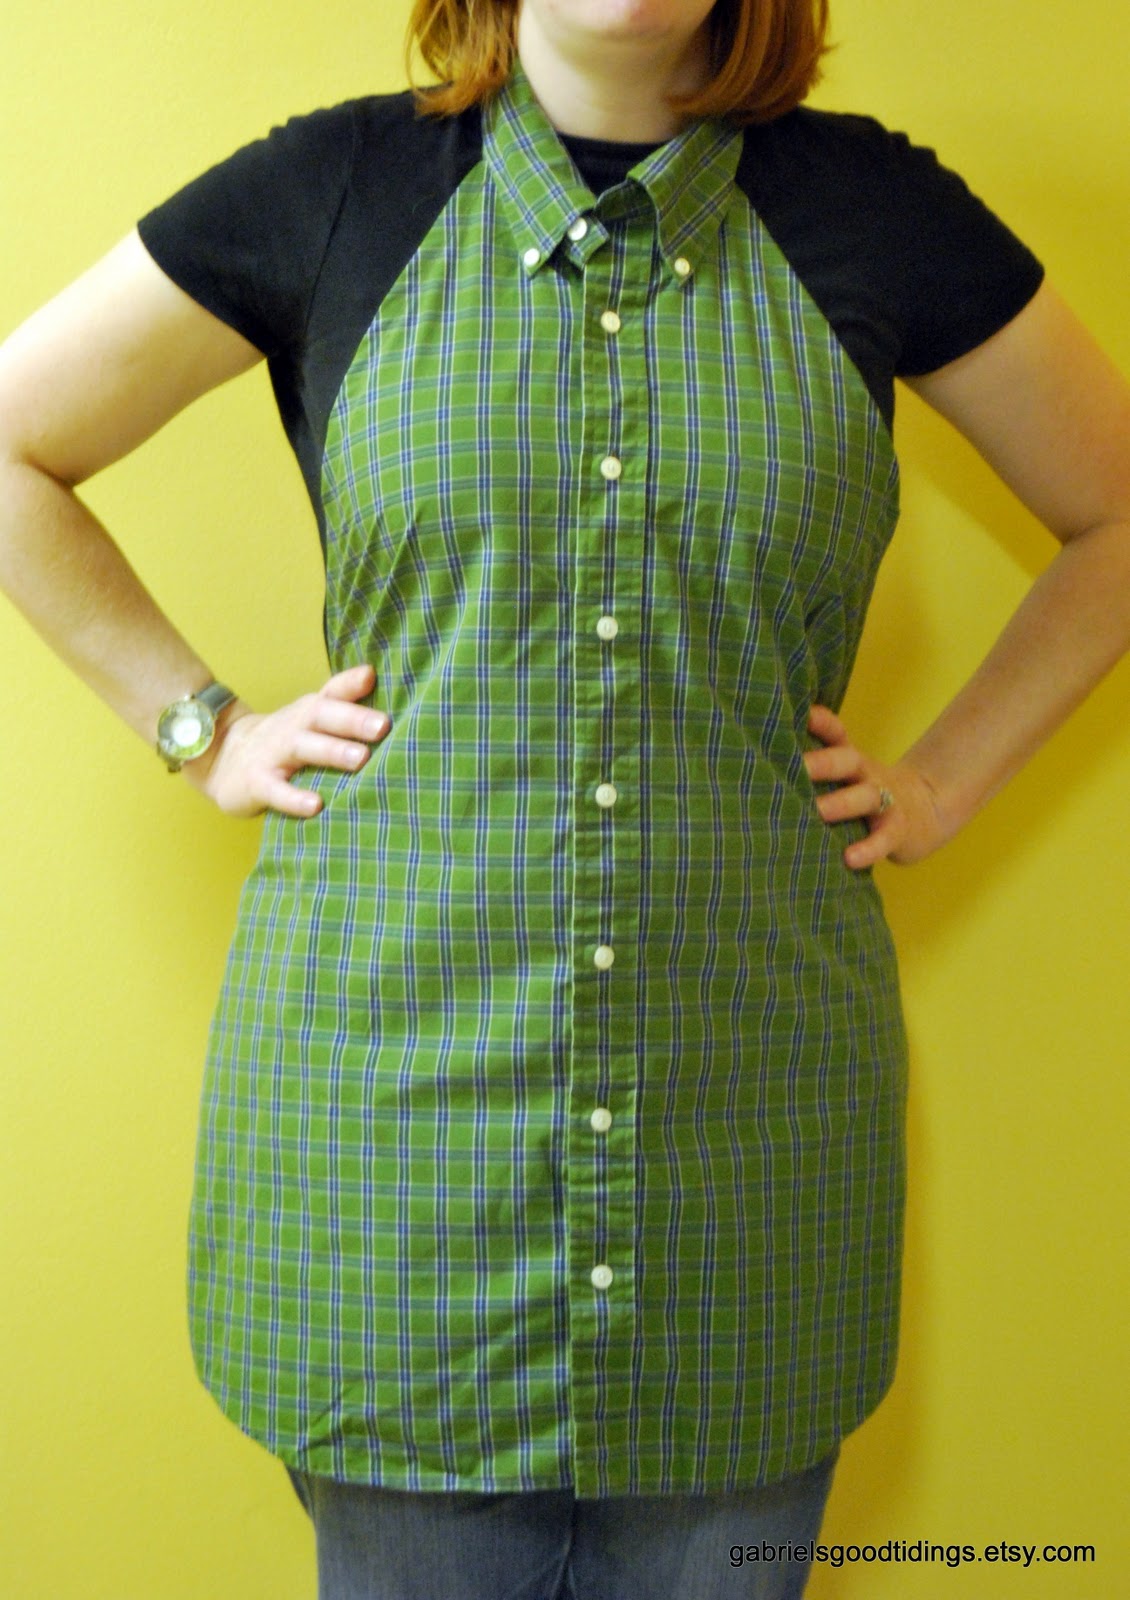
Men’s Dress Shirt Repurposed to Apron Tutorial

Here’s the tutorial and some helpful tips –
Here goes….

Obviously, start with a man’s shirt. Cut off the sleeves and the back.
Cut around the collar but leave it intact. I cut very close to the seam so that I wouldn’t have to hem anything or have any raw edges.

Your shirt should look like this –

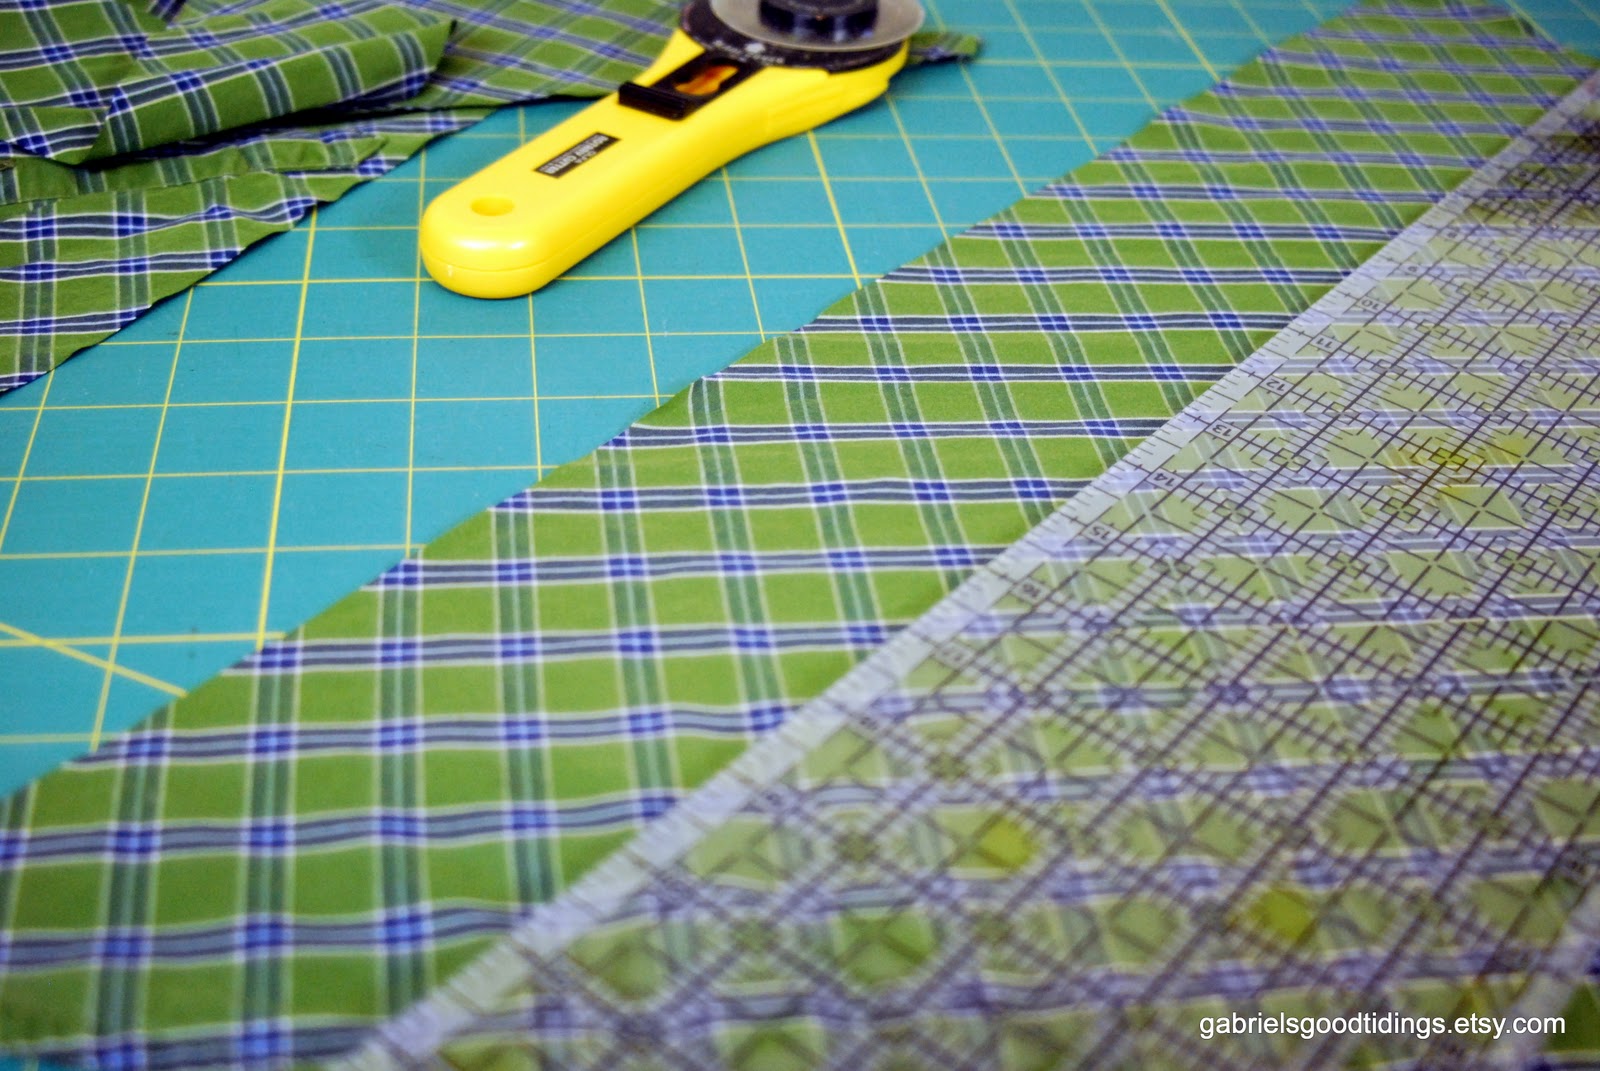
Use your rotary cutter and ruler to make a diagonal cut from the armpit to the top of the shoulder.

Make sure both sides are even. 🙂

On the raw edge that you just cut, turn a hem under, concealing all raw edges, and sew it down. Do this on both sides.

The final step is to make the apron ties. You could use ribbon if you wanted, but I chose to cut strips of fabric on the bias to make the apron interesting.
Close all raw edges in and sew your straps on to the bottom of your diagonal cut. Be sure to backstitch several times for reinforcement.

And you’re done!

A couple of final tips-
Flip the collar up until you are completely done with the apron. This keeps you from accidentally stitching it down and it just puts it out of the way!
Second, button the shirt all the way down at the very beginning. This will help your fabric stay straighter.
If you have a plaid shirt, that is a good starter since you can use the stripes as your guide for keeping it straight.

How to Make an Easy Apron with Fat Quarters


Supplies
- Two matching fat quarters (18″ x 22″)
- One coordinating fat quarter
- Cotton trim
- Straight pins
- Scissors
- Sewing machine
- Ironing board and iron

Directions
Step 1: Take your two matching fat quarters and put their patterned sides together. Pin the sides and sew a 1/2″ seam all the way around, leaving a few inches open.

Step 2: After you sew, chop those pesky corners off. Getting rid of the extra fabric will make it easier to sew a decorative seam along the outside later.

Step 3: Remember that opening? Use it to flip the fabric right-side-out. Fold the loose edges so they’re even with the rest of that side and press them. While you’re at it, go ahead and press the whole thing so it’s nice and crisp.

Step 4: Put the fabric back under the needle and sew a 1/4″ seam all the way around. This does two things: it will close the hole, which is obviously important, but it also adds a little detail to an otherwise basic piece. You so fancy.

Step 5: Take your contrasting fat quarter and cut two 7″ x 14″ rectangles. Repeat steps 1 through 3 to get the pocket flap. Press the edges of the opening, but don’t sew the outside stitch yet. Pin it to the front of your apron with the opening along the bottom.

Step 6: Is it pinned? Okay, now you can line the edge of your pocket up with your presser foot. Sew down one side, across the bottom and up the other side – but NOT across the top (this is a pocket, remember?). This will attach your pocket to the main part of the apron AND close the opening at the same time. #multitasking

Step 7: Finally, pin the cotton trim in place along the top of the apron. I used 2 yards, but you can adjust based on your waist size and whether or not you like to double-wrap it around yourself. To attach said trim I did a 1/4″ seam near the top and a 1/4″ seam near the bottom.

Now you can go twirl around in the kitchen without the fear of splattering muffin batter/stir fry/spaghetti sauce on your jeans! One of these could also be part of a cute gift basket with some wooden spoons and a cookbook.
