

Knit Fabric 101
To understand the basic difference between cotton and knit fabric, let’s look at some diagrams. Cotton is woven:
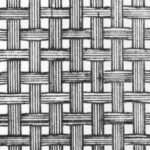
Knits are, well, knitted (with loops):

Knits, Knits, Knits…
There are single knits, double knits, and rib knits. Some look different on each side, but some look the same on both sides. Some stretch a lot, but some stretch only a little. Some are thick, yet some are so thin that you can see right through them.

What you need to sew knits
Thankfully there are some great tools that can make sewing with jersey knit fabrics easier, some you NEED, others are just NICE TO HAVE.
A Serger
Most beginners do not start off with a serger, however, if you do have one. My personal experience is jersey knit is why I love my serger. I use it all the time when sewing jersey knits. It is quick and clean! A serger will sew along the edges with a professionally looked finish while it cuts your seams at the same time. This is a NICE TO HAVE, but you do NOT need a serger to sew jersey.
A Cover Stitch Machine
Another on the NICE TO HAVE list is a cover stitch machine, but beginners do not usually have these lying around their sewing “studio” either. A commercially sewn knit item usually has a hem with a double row of stitching. A cover stitch machine hems these up quick and neat in one step. But no worries, you can get this same look with a regular sewing machine.
Sewing Machine
Any sewing machine will do! This is your MUST have when it comes to sewing your jersey knit. And chances are if you are reading this, you already have this and you are waiting to jump right in and get making your knit projects!

Here are a few things that can also help you sew your stretch fabrics
Ballpoint Needles
A ballpoint needle has a slightly rounded tip that allows it to slip through the fibers of your fabric, rather than ripping them as a regular needle would. Using a regular needle on a stretchy or delicate knit, creates tiny tears in the fabric that will get worse as you wash and wear. A ballpoint needle is a MUST have.

Ballpoint is on the left, straight is on the right – notice the difference?
A Twin Needle
Some machines will come with a twin needle, or you can purchase one at a reasonable price.

If your machine can zig-zag chances are that it can accommodate a twin needle. The benefit of a twin needle is that it builds stretch into your seams by creating two lines of straight stitches on the top of your item with a zig zag underneath. This will eliminate popped seams, and you will not have to precisely stretch your fabric as you sew. When you use a twin needle, you’ll use two spools of thread on the top. Your machine may have come with an extra spool pin that fits on top of the bobbin holder you normally use while winding bobbins, like this:

But even if you don’t have an extra spool pin, you can use two threads by placing the second spool of thread somewhere nearby (on a thread rack, in a cup) where it won’t get tangled or resist unrolling while you sew. One of the most creative thread holders I have seen was poor Barbie Duct taped near a sewing machine with her handy dandy leg holding the spool of thread. Creative genius – gotta utilize your resources!
Once you’ve set up your spools, you’ll run both threads through the machine as you normally would the one thread. You thread the needles manually, the left one with your normal spool, and the right one with the additional spool.

Then you use your zigzag foot while sewing. This is also going on my NICE TO HAVE list. It will give you a more professional look. However, you can sew knits using a single needle.
Walking foot
Those who have a walking foot will swear by them and never take them off of their sewing machines. Why? Because they make a noticeable difference. A walking foot moves both the top and bottom layers of fabric at the same time. This makes it a lot easier to avoid stretching the fabric while you sew. You can sew jersey without a walking foot so it is going on my NICE TO HAVE list.
A walking foot just makes it much easier to keep the seams from becoming stretchy and well… looking saggy.

Interfacing
I have only used interfacing once when sewing with jersey. If you are looking to make t-shirt quilts, this is a step you do not want to miss! Interfacing will help to stabilize a seam that will get stretched/pulled during use. Applying an iron-on adhesive prior to cutting your t-shirts will help your fabric keep its shape. You don’t want to use regular old interfacing, you want to find one for knits that is more flexible. Try to match it to your fabric’s flex as close as you can.
![]()
Stitches for Sewing with Knit Jersey Fabric
If you just sew stretchy fabrics together with a straight stitch, it takes that stretch away at your seam! Even worse, when the fabric gets stretched out the seams will pop. You can avoid wasting all of that hard work by using the right stitch.
Let me back up… If you are sewing with a twin needle, you can use a straight stitch, since the twin needle straight stitch has stretch built-in.
If you do not have the twin needle yet, you can sew knits with one needle, no worries. Chances are that your machine came with a standard stretch stitch. This is the one that looks like an “offset” zig zag – it looks like a lightning bolt. This stitch creates a seam that can stretch with your fabric. Look at stitch #3. Ta-da! That is the one you are looking for!

If you don’t have a stretch stitch there is a solution! A narrow zig zag stitch will do just fine. Just set your width and length. The standard zig zag stitch will also allow your fabric to stretch.
On to Sewing Knit Jersey Fabric
Don’t be discouraged but, there will be a lot of trial and error when working with this type of fabric. Test your fabric! Have scraps and extras to make sure your “set up” is going to work.
If you are using your walking foot and a stitch with stretch, then you want to be sure DO NOT stretch or tug, or pull your fabric out as you sew. If you do you will end up with sloppy seams and stretched out holes, etc.
Finishing Inside Seams
One of my favorite things about sewing with jersey is that it will not unravel (yeah, no fray), so you really do not need to worry about finishing your inside seams (aside from cutting them even if you are using a regular sewing machine).
If you are sewing with a thick fabric, a seam allowance from 1/2″ to 5/8″ is fine. If you are sewing with a thin/delicate knit fabric, the edges will roll (deep sigh – patience, patience, patience while sewing this), in which case you want to sew (or cut down) to a very small allowance.
Ready to give it a try?
Here is a tutorial with a video for a VERY beginner-friendly jersey knit project. Give it a try and get the feel for how sewing this type of fabric goes for you.