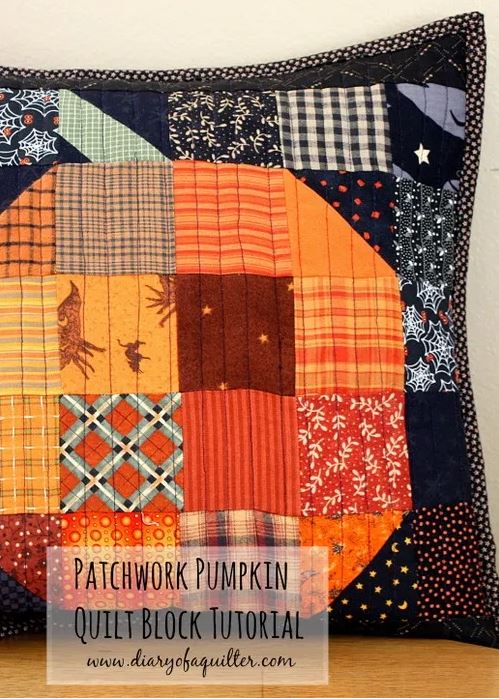
A couple of years ago I made this simple patchwork pumpkin throw pillow. It’s an easy project perfect for using up scraps. Here’s a tutorial for this quilt block as well as some other patchwork pumpkin projects to make some quick scrappy Halloween decorations.
Quilt Block tutorial (13 1/2″ x 13 1/2″ finished)
Fabric requirements:
- 16 orange squares 2 3/4″ x 2 3/4″
- 17 black squares 2 3/4″ x 2 3/4″
- 1 black square 1 1/2″ x 1 1/2″
- 1 green square 2 3/4″ x 2 3/4″
- 1 black strip 1 1/2″ x 14″
- 1 black strip 1 3/4″ x 14″

To create the 16-patch pumpkin block begin by matching 4 black 2 3/4″ x 2 3/4″ squares with 4 orange 2 3/4″ x 2 3/4″ squares. Draw a diagonal line on the back of the orange squares and sew pairs together directly on the line. Trim 1/4″ away from the seam to create a 1/4″ seam allowance and press blocks open, pressing seams toward the black.

Layout remaining orange 2 3/4″ squares with new half-square-triangle orange and black blocks into four rows of four.

Sew together into four rows, pressing seams in alternating directions, every other row.

Sew four rows together.

To create green stem blocks, match-up a green 2 3/4″ block with a black 2 3/4″ block. Draw a diagonal line on the back of the green and sew directly on the line. Trim 1/4″ away and press block open. Match up a 1 1/2″ square in the corner of the green triangle. Draw a diagonal line and sew directly on the line. Trim 1/4″ away and press corner open. Repeat four times to make 5 stem blocks.

To create stem row, use 3 other black 2 3/4″ squares and sew together into a row of four. Press seams all one direction.

Attach stem rows to the ‘top’ of each of the 5 pumpkin blocks.

Sew two rows of five 2 3/4″ x 2 3/4″ black squares. Sew to both sides of the pumpkin block. Add black 1 1/2″ x 14″ strip to the top of the block and black 1 3/4″ strip to the bottom of the block.

To use as a pillow, use your favorite pillow finishing method and stuff with a 14″ x 14″ pillow form.

Table Runner Tutorial 15 1/4″ x 57 1/2″

This look includes a variety of styles of pumpkin blocks to make it an even scrappier and unpredictable patch of pumpkins, good for showing off larger pumpkin prints as well. This row version could be easily replicated to make an entire quilt.

Fabric Requirements for the table runner:
- 4-5 assorted orange and black fat quarters or assorted scraps
- Sashing 1/2 yard black print (I used the black spiders from Too Cute to Spook)
- Green solid: 1/8 yard
- Gingham Binding: 3/8 yard
- Backing: 1 1/8 yard
Cutting
From assorted oranges cut:
2 squares 9 1/2″ x 9 1/2″
8 squares 5″ x 5″
16 squares 2 3/4″ x 2 3/4″
From black sashing yardage cut:
5 strips 2 1/2″ x 42″. Sub cut 2 strips into 6 pieces 2 1/2″ x 11 3/4″. Use remaining strips to create two 2 1/2″ x 57 1/2″ border strips.
From black scraps (including sashing print) cut:
40 squares 2 3/4″ x 2 3/4″
5 squares 1 1/2″ x 1 1/2″
From binding cut 4 strips 2 1/2″ x 42″

Take four of the 2 3/4″ x 2 3/4″ black squares and draw one diagonal line across them. Place them in the four corners of the 9 1/2″ x 9 1/2″ orange blocks. Sew directly on all four diagonal lines.

Trim 1/4″ away and press new corners open, pressing seams toward the black.

Sew 2 four-patch blocks with the eight 5″ x 5″ squares and add corners to those blocks as well.
To create the 16-patch pumpkin block begin by matching 4 black 2 3/4″ x 2 3/4″ squares with 4 orange 2 3/4″ x 2 3/4″ squares. Draw a diagonal line on the back of the orange squares and sew pairs together directly on the line. Trim 1/4″ away from the seam to create a 1/4″ seam allowance and press blocks open, pressing seams toward the black.
Layout remaining orange 2 3/4″ squares with new half-square-triangle orange and black blocks into four rows of four.
Sew together into four rows, pressing seams in alternating directions, every other row.
Sew four rows together.
To create green stem blocks, match-up a green 2 3/4″ block with a black 2 3/4″ block. Draw a diagonal line on the back of the green and sew directly on the line. Trim 1/4″ away and press block open. Match up a 1 1/2″ square in the corner of the green triangle. Draw a diagonal line and sew directly on the line. Trim 1/4″ away and press corner open. Repeat four times to make 5 stem blocks.
To create stem row, use 3 other black 2 3/4″ squares and sew together into a row of four. Press seams all one direction.
Attach stem rows to the ‘top’ of each of the 5 pumpkin blocks.

Layout five pumpkins in a row, rotating the second and the fourth the opposite direction. Sew the six 2 1/2″ x 11 3/4″ strips alternating between the five pumpkins and at both ends. Press seams towards the sashing strips.

Add two 2 1/2″ x 60″ strips to top and bottom of row of pumpkins. Press toward the sashing strips.

From backing fabric cut two 20″ x 42″ pieces and sew them together end to end. Trim backing to 20″ x 66″. Now you are ready to quilt. Baste top and bottom pieces with batting in between.

Quilt as desired. I used simple straight cross-hatching lines. (For more details about basting and quilting see this post.)

Sew four 2 1/2″ x 42″ gingham strips together end to end to create binding. Binding a quilt tutorial here.
And there you go – a simple patchwork pumpkin Halloween quilt table runner. You could easily multiply this project by six, creating six rows to make a darling Halloween quilt.


Happy sewing and spooking!